Steps for Performing Fire Extinguisher Inspection [+ Free Monthly Checklist]
As a business, you’re legally and ethically obligated to protect your employees, customers, and assets from the danger of workplace fire. One of the most vital elements of fire safety is having accessible fire extinguishers at all times.
But here’s the thing: just having fire extinguishers hanging on the wall isn’t enough. If they’re damaged, blocked, or low on pressure, they won’t help when you need them most. That’s what a regular fire extinguisher inspection is for.
Let's see what a fire extinguisher inspection entails, why they matter, and how to complete them the right way — plus a free checklist you can use to stay on top of monthly inspections.
How often should fire extinguishers be inspected?
According to the National Fire Protection Association (NFPA 10) and OSHA (standard 29 CFR 1910.157) regulations, fire extinguishers in the workplace must be inspected and maintained as follows:
- Monthly visual inspections: A responsible person should visually inspect each fire extinguisher to ensure it is fully charged, accessible, and free from obvious signs of damage or tampering.
- Annual maintenance: A certified professional must conduct a full maintenance check to verify that the extinguisher is in proper working order.
- Hydrostatic testing: Required every 5, 6, or 12 years, depending on the type of extinguisher and cylinder material, to confirm the integrity of the pressure vessel.

Adhering to these guidelines ensures your portable fire extinguisher is compliant and ready to be used in an emergency.
Steps for performing a monthly fire extinguisher inspection
You don’t need a special license or certification to do a monthly fire extinguisher inspection. This task can easily be assigned to any responsible employee you choose — maybe your office manager or a safety coordinator.
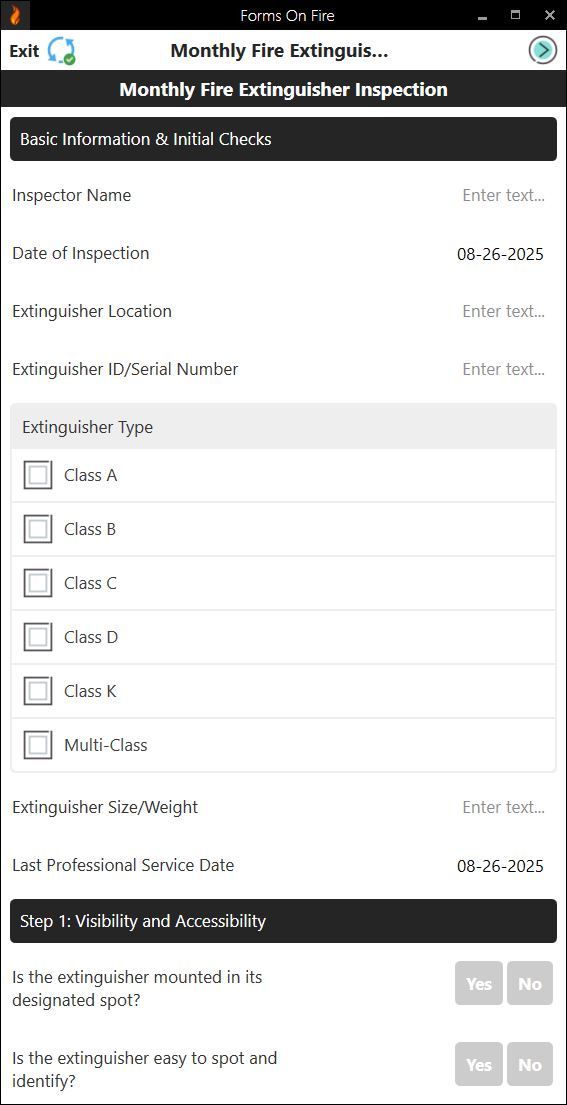
The entire process usually takes just 2 to 3 minutes per extinguisher, but those few minutes can make all the difference in an emergency. The key is to be thorough and follow the same steps every time — which is why we recommend using a digital fire extinguisher inspection checklist (we will give you one in the next section).
Here’s how to do the monthly fire extinguisher inspection. You can find a
more detailed, digital version of the checklist at the end of the article.
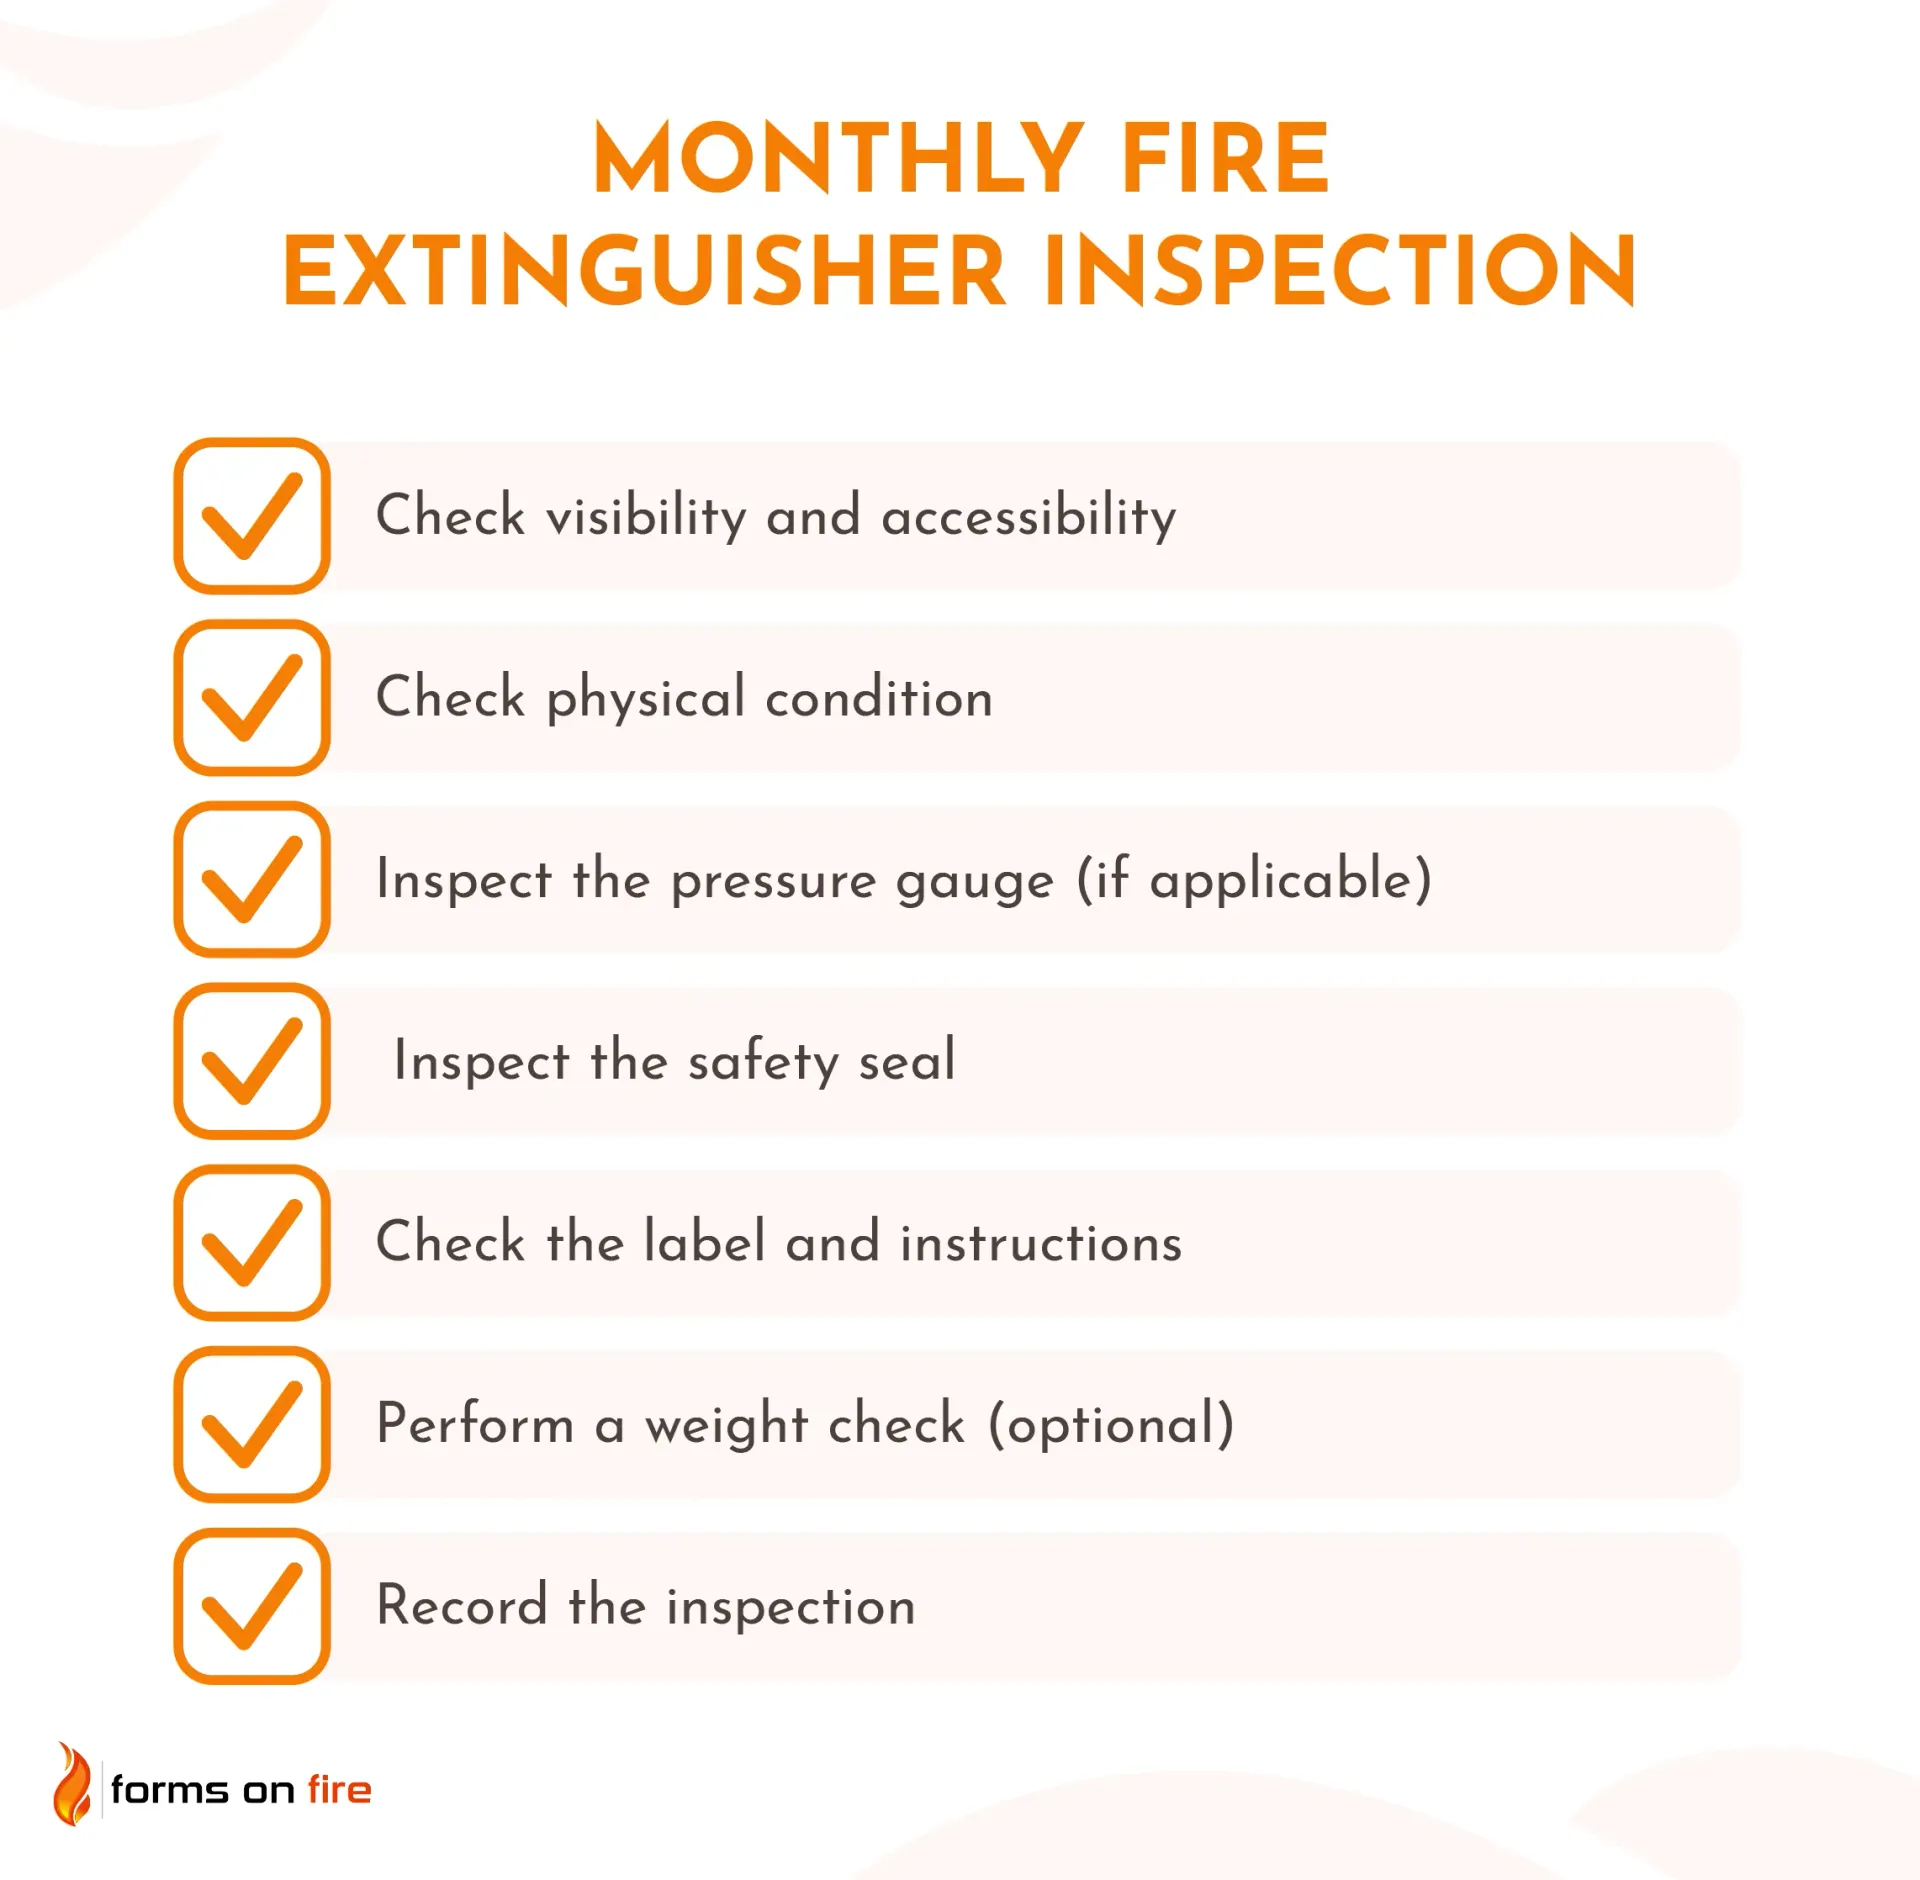
1) Check visibility and accessibility
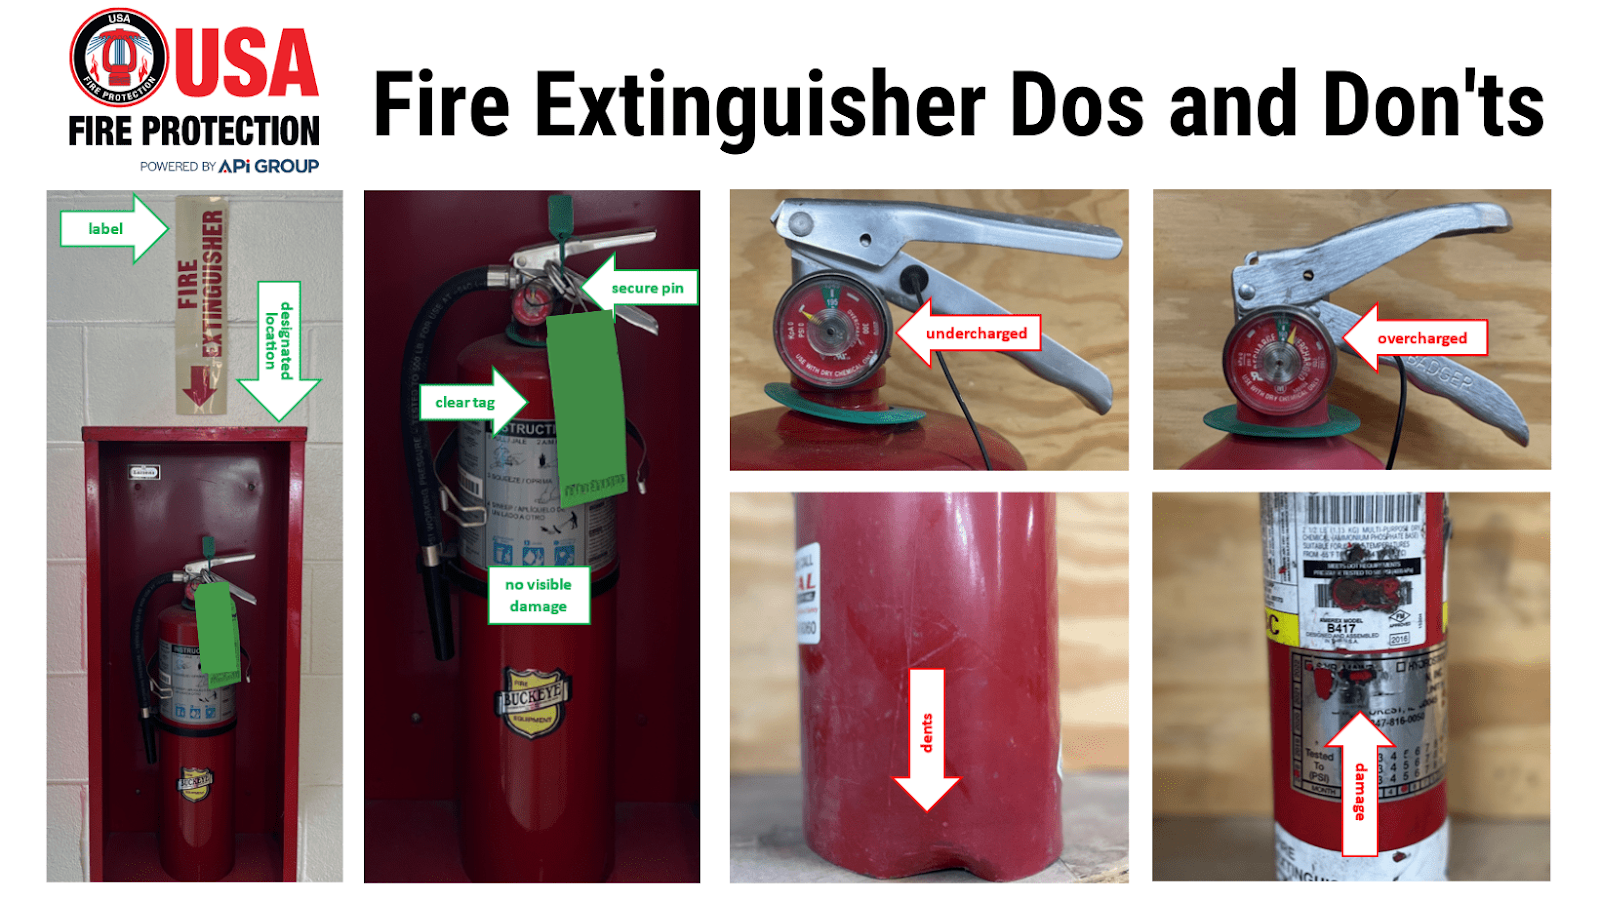
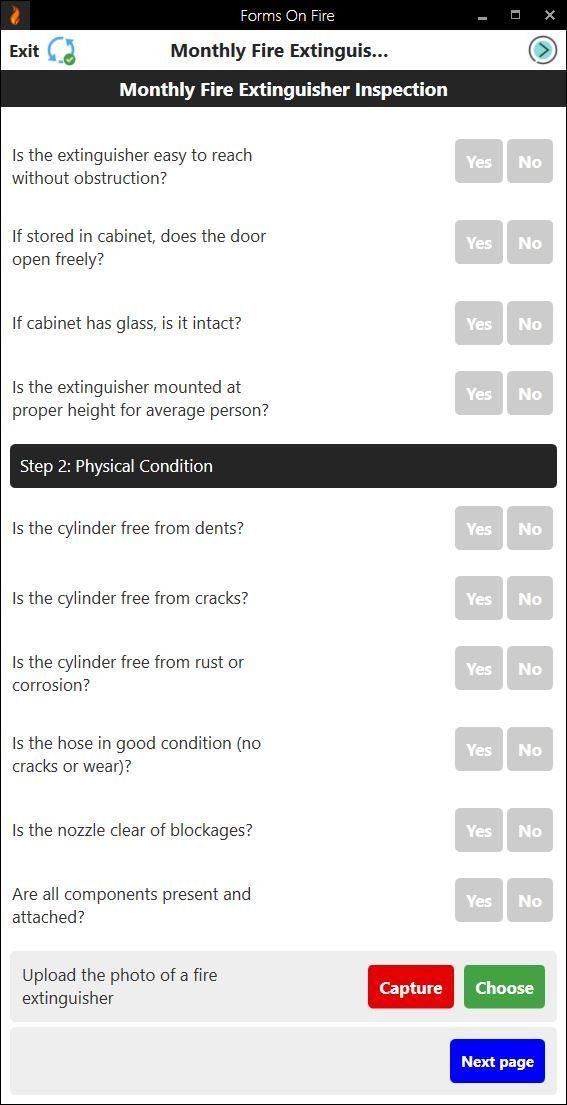
Make sure the extinguisher is easy to spot and easy to reach. It should be mounted in its designated spot, not shoved into a corner or blocked by boxes, furniture, or equipment. If your extinguisher is stored inside a cabinet, the door should open freely, and the glass (if any) should be intact.
Common issues to watch out for at this step:
- Extinguisher hidden behind stacked inventory.
- Furniture or decorations are blocking access.
- The cabinet door is stuck or difficult to open.
- The extinguisher is mounted too high or too low to grab quickly for an average person.
2) Check physical condition
Give the extinguisher a quick but careful once-over. Look for dents, cracks, rust, or other damage to the cylinder. Check the hose and nozzle for cracks, blockages, or wear. Even minor defects can make the extinguisher unsafe or ineffective in an emergency. If you see anything suspicious, the extinguisher should be removed from service and reported for maintenance right away.
Common issues to watch out for:
- Rust or corrosion spots on the cylinder.
- Dents from being dropped or bumped.
- Cracked or brittle hoses.
- Nozzle clogged with dust, dirt, or debris.
- Broken or missing hose/nozzle entirely.
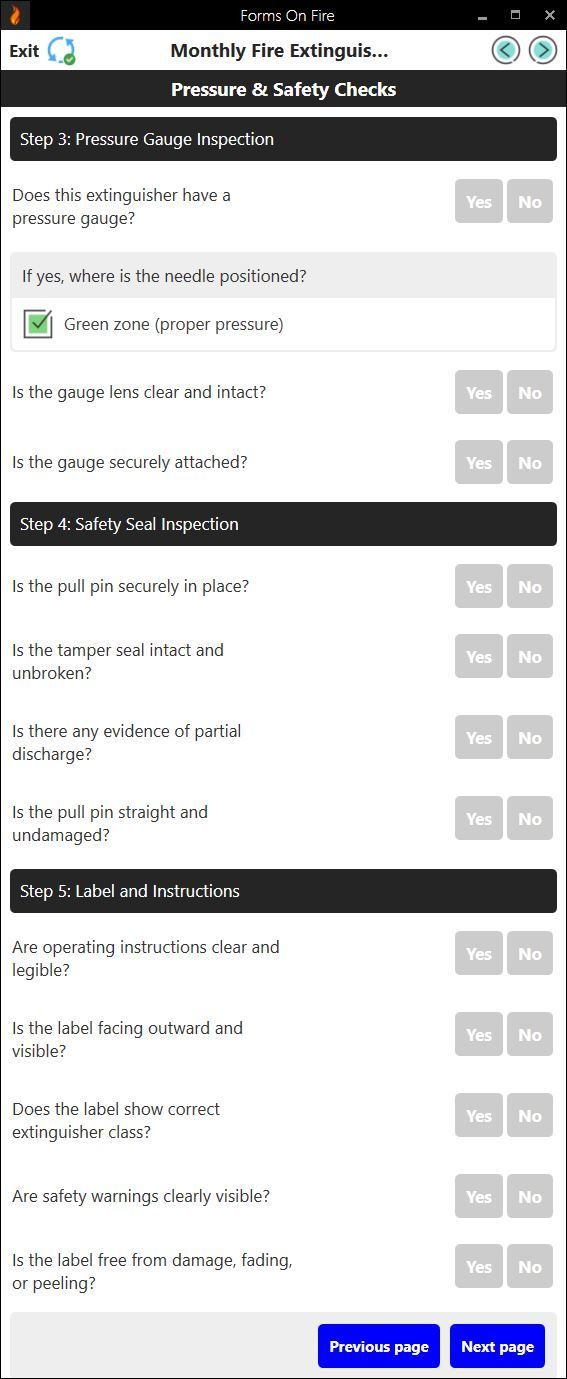
3) Inspect the pressure gauge (if applicable)
Look at the extinguisher’s pressure gauge (if it has one — CO₂ models usually don’t). The needle should be firmly in the green zone, which means the extinguisher is properly pressurized.
If the needle is in the red zone on the left, the pressure is too low and it may not discharge properly. If it’s in the red zone on the right, it’s over-pressurized, which can be dangerous. Either way, remove it from service and arrange for professional servicing.
Common issues to watch out for:
- Needle in the low-pressure zone (often due to slow leaks).
- Needle in the overcharged zone (possible heat exposure or incorrect refill).
- Gauge lens cracked, foggy, or missing.
- Gauge loose or damaged.
4) Inspect the safety seal
Check that the pull pin is securely in place and held by an intact tamper seal. The seal prevents accidental discharge and also serves as a quick indicator that the extinguisher hasn’t been used or tampered with. If the seal is broken or missing, treat the extinguisher as if it may have been used — it should be removed from service and inspected by a professional.
Common issues to watch out for:
- Tamper seal broken or missing.
- Pull pin bent, missing, or stuck in place..
- Evidence of partial discharge (residue around the nozzle or hose).
5) Check the label and instructions
Make sure the extinguisher’s operating instructions are clear, legible, and facing outward so they can be skimmed in an emergency. The label should include the type of extinguisher (Class A, B, C, D, or K), basic usage steps, and any safety warnings. If the label is faded, peeling, or damaged, it needs replacing — people can’t follow instructions they can’t read.
Common issues to watch out for:
- Label faded from sun exposure.
- Dirt, grease, or paint covering parts of the instructions.
- Label peeling or torn off.
- Extinguisher mounted so the label faces the wall.
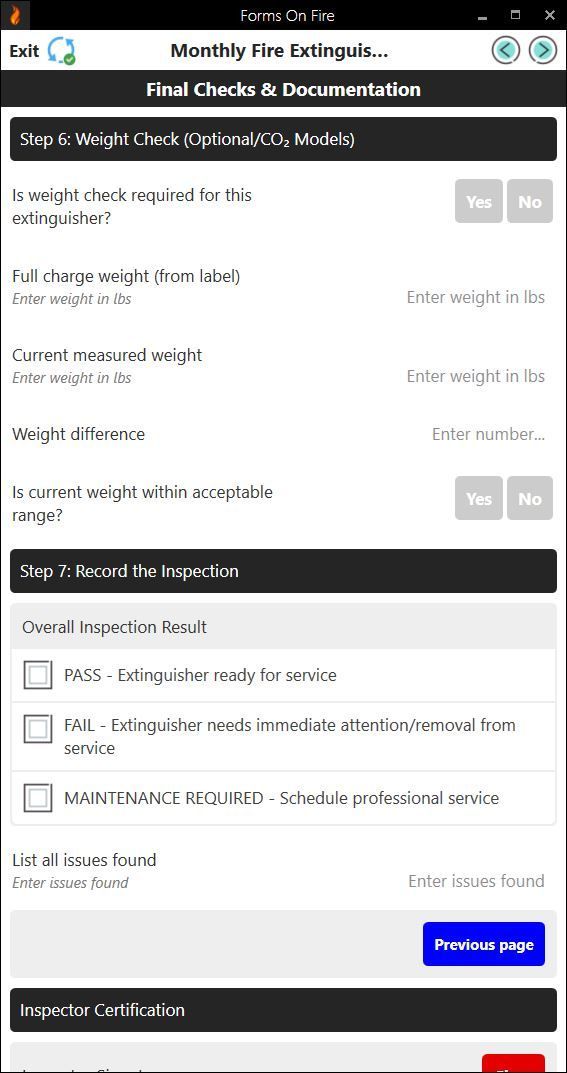
6) Perform a weight check (optional)
Some extinguishers, like CO₂ models, don’t have a pressure gauge. For these, the only way to confirm they’re fully charged is by weighing them. Compare the extinguisher’s current weight to the “full” weight listed on the label or stamped on the cylinder. If it’s lighter than it should be, it could mean a leak — and the extinguisher should be taken out of service for maintenance.
Common issues to watch out for:
- Weight noticeably lower than the full charge weight.
- Missing or unreadable weight markings.
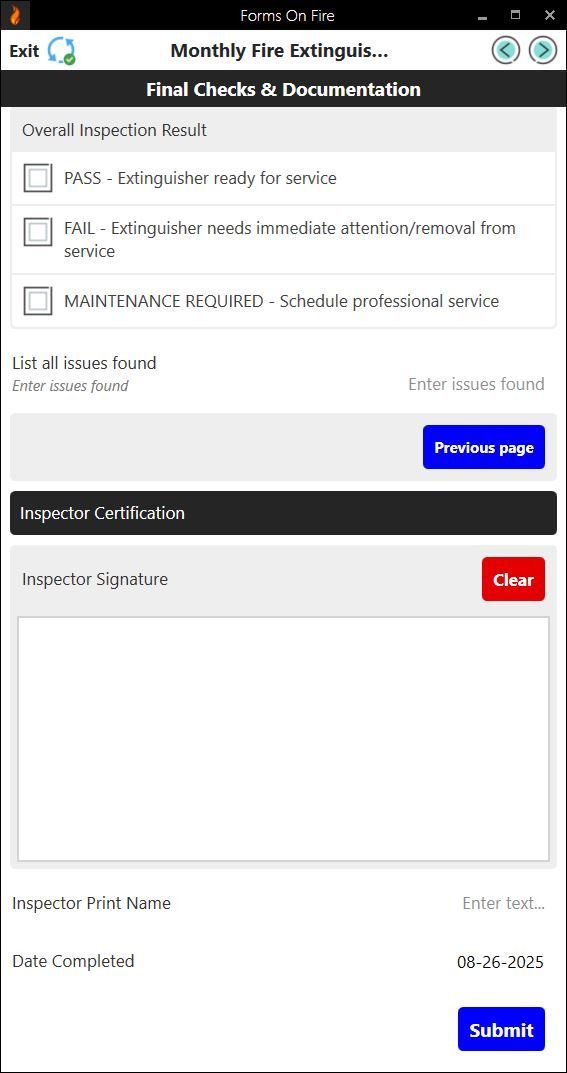
7) Record the inspection
Once you’ve checked everything, record your inspection on the extinguisher’s tag or inspection log. Write the date and your initials (or full name, depending on company policy). This creates a visible record that the extinguisher has been checked and is ready for use — and it helps you stay compliant with NFPA and OSHA requirements.
If you find any issues during the inspection, note them separately and report them right away so the extinguisher can be repaired or replaced.
For reference, here are the images that show the most common issues we just outlined:
Use our monthly fire extinguisher inspection checklist
To simplify the process, using our no-code platform called Forms On Fire, we quickly turned the steps outlined above into a digital fire extinguisher inspection checklist template.
You can see how the template looks below (you can click on any of the images to enlarge them). To access it, sign up for a free trial and find the template inside our database.
Why go digital? Digital checklists solve many problems that come with paper records:
- No lost paperwork — everything’s stored securely in the cloud.
- Faster audits — pull up inspection records instantly for fire marshals or insurance.
- Real-time reporting — issues found during inspections can be flagged and sent to maintenance right away.
- Consistency — everyone who does the inspections follows the same steps, every time.
- Mobile friendly — inspections can be done right from a phone or tablet, even on the shop floor.
Streamline your fire extinguisher inspections with Forms On Fire. Check out our complete list of premade templates by
starting a 14-day free trial.