Job Hazard Analysis: Form Template & Best Practices
According to the U.S. Bureau of Labor Statistics, private industry employers reported over 2.8 million nonfatal workplace injuries and illnesses in 2022 alone.
Job Hazard Analysis (JHA) presents one way to bring that number down. It’s a simple but powerful tool that helps identify risks before they lead to injuries. By breaking down tasks and spotting hazards early, JHA can play a major role in keeping people safe — and reducing downtime, liability, and costs.
In this article, we’ll walk through everything you need to know about JHA:
- What it is (and how it's different from other safety assessments)
- What to include in a JHA form
- How to build a reusable digital template
- Step-by-step instructions for doing a proper analysis
- Best practices that make JHA more effective.
Let’s help you build safer job sites and smarter safety programs.
What is a job hazard analysis (JHA)?
A Job Hazard Analysis (sometimes referred to as Job Safety Analysis) is a process used to identify potential hazards associated with specific job tasks — before they cause harm. The goal is simple: break down a job into individual steps, identify the risks tied to each step, and determine how to eliminate or control those risks.
It’s easy to confuse JHA with other safety tools, but here’s how they’re different:
- Risk assessments evaluate the overall risk level of a workplace or process, often considering probability and severity.
- Safety audits look at compliance with safety policies and regulations.
- JHAs, on the other hand, are task-specific. They focus on how a job is done and what can go wrong in each step.
While OSHA doesn’t mandate JHAs by name, it strongly recommends them as part of a proactive safety program. According to their guidelines, employers are responsible for identifying and addressing workplace hazards — and JHA is one of the best ways to do that.
OSHA also provides a helpful guide called “Job Hazard Analysis” (OSHA 3071), which walks through the process in detail.
What is a job hazard analysis form?
A Job Hazard Analysis (JHA) form is a structured document used to capture the details of a job hazard analysis. It helps safety teams organize their observations, document risks, and track the controls put in place to reduce those risks.
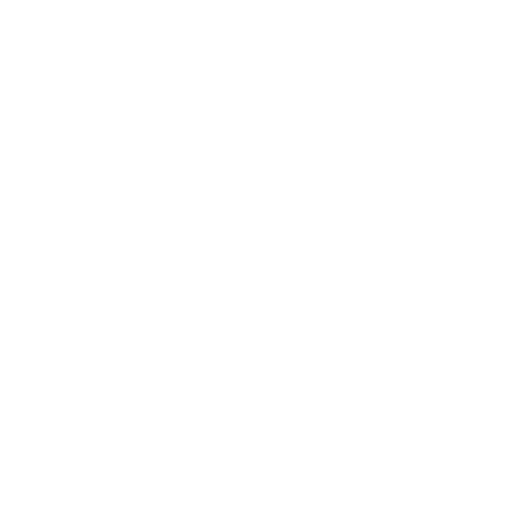
The OSHA guide we just mentioned uses this simplified version of a job hazard analysis form.
Most organizations will want to include additional details, but this provides a general idea of the key elements of the worksheet. Here is an example of JHA template that includes more details.
Whether you’re doing the analysis on paper or digitally, the form acts as both a checklist and a record for accountability and training.
Recommended fields to include in a job hazard analysis form:
- Job/task name: What task is being analyzed.
- Location: Where the task is performed.
- Date of analysis: When the JHA was conducted.
- Team members: Names of those who conducted the analysis.
- Step-by-step breakdown: A list of the main actions involved in the job you are analyzing.
- Hazards identified: Specific risks tied to each step.
Recommended controls: How each hazard will be mitigated (e.g., PPE, training, equipment changes).
Optional fields to have in a JHA template:
- Tools and equipment used: Useful for identifying equipment-specific risks.
- Sign-off section: To confirm review by supervisors or safety managers.
- Review date: For scheduling future updates or reassessments.
A well-designed JHA form makes it easier to complete a thorough analysis and ensures nothing gets overlooked — especially when it’s reused across teams or locations.
Create a customized JHA template
Having a reusable, standardized JHA template saves time, ensures consistency, and minimizes the room for human error.
You don’t need to start from scratch. Mobile forms software like Forms On Fire makes it easy to build a digital JHA template that teams can use in the field — even offline. Here’s how it usually works:
- You drag and drop fields to personalize your JHA forms (like job steps, hazards, and controls).
- You can set up dropdowns, required fields, and photo uploads for better documentation.
- You can assign forms to teams and track completion in real time.
- If something changes (like a new procedure or piece of equipment), you can push updates to everyone instantly by updating your original JHA template.
On top of that, you get automatic time stamps, version history, and sign-offs — which means you can quickly filter or export JHA data for safety audits, compliance, or internal reviews.
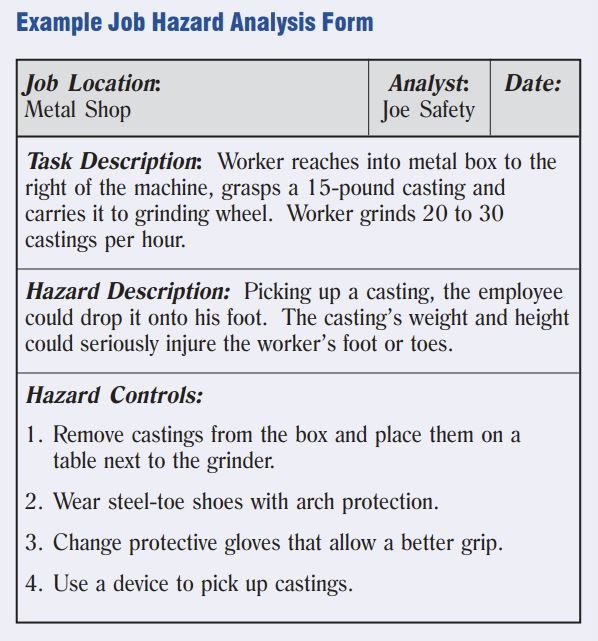
Steps for conducting job hazard analysis
A Job Hazard Analysis can take anywhere from a couple of hours to a few days, depending on the complexity of the task and the level of detail required. It’s typically carried out by safety managers, supervisors, or team leads — but involving workers who actually perform the task is a must.
Below are the four main steps involved in conducting a JHA — and to make it practical, we’ll walk through a real-world example: Cleaning and maintaining a commercial HVAC unit on a rooftop.
1) Select a job to analyze
Start by choosing which job or task to focus on. Prioritize jobs that:
- Have a high rate of incidents or near misses
- Involve hazardous materials, heavy equipment, or complex procedures
- Are new or have recently changed
- Haven’t been analyzed in a long time.
Example: You decide to analyze routine rooftop HVAC maintenance. It involves electrical components, exposure to heights, and potentially sharp or moving parts — a clear candidate for JHA.
2) Break the job into steps
Next, break the job down into clear, simple steps. Keep each step specific and action-based — avoid being too broad.
Example (steps for rooftop HVAC maintenance):
- Transport tools and PPE to the rooftop.
- Inspect the unit exterior and area around it.
- Shut down power to the unit.
- Open access panels and inspect internal components.
- Replace filters and check electrical connections.
- Restart and test the unit.
- Clean up and log the work performed and parts spent.
3) Identify hazards for each step
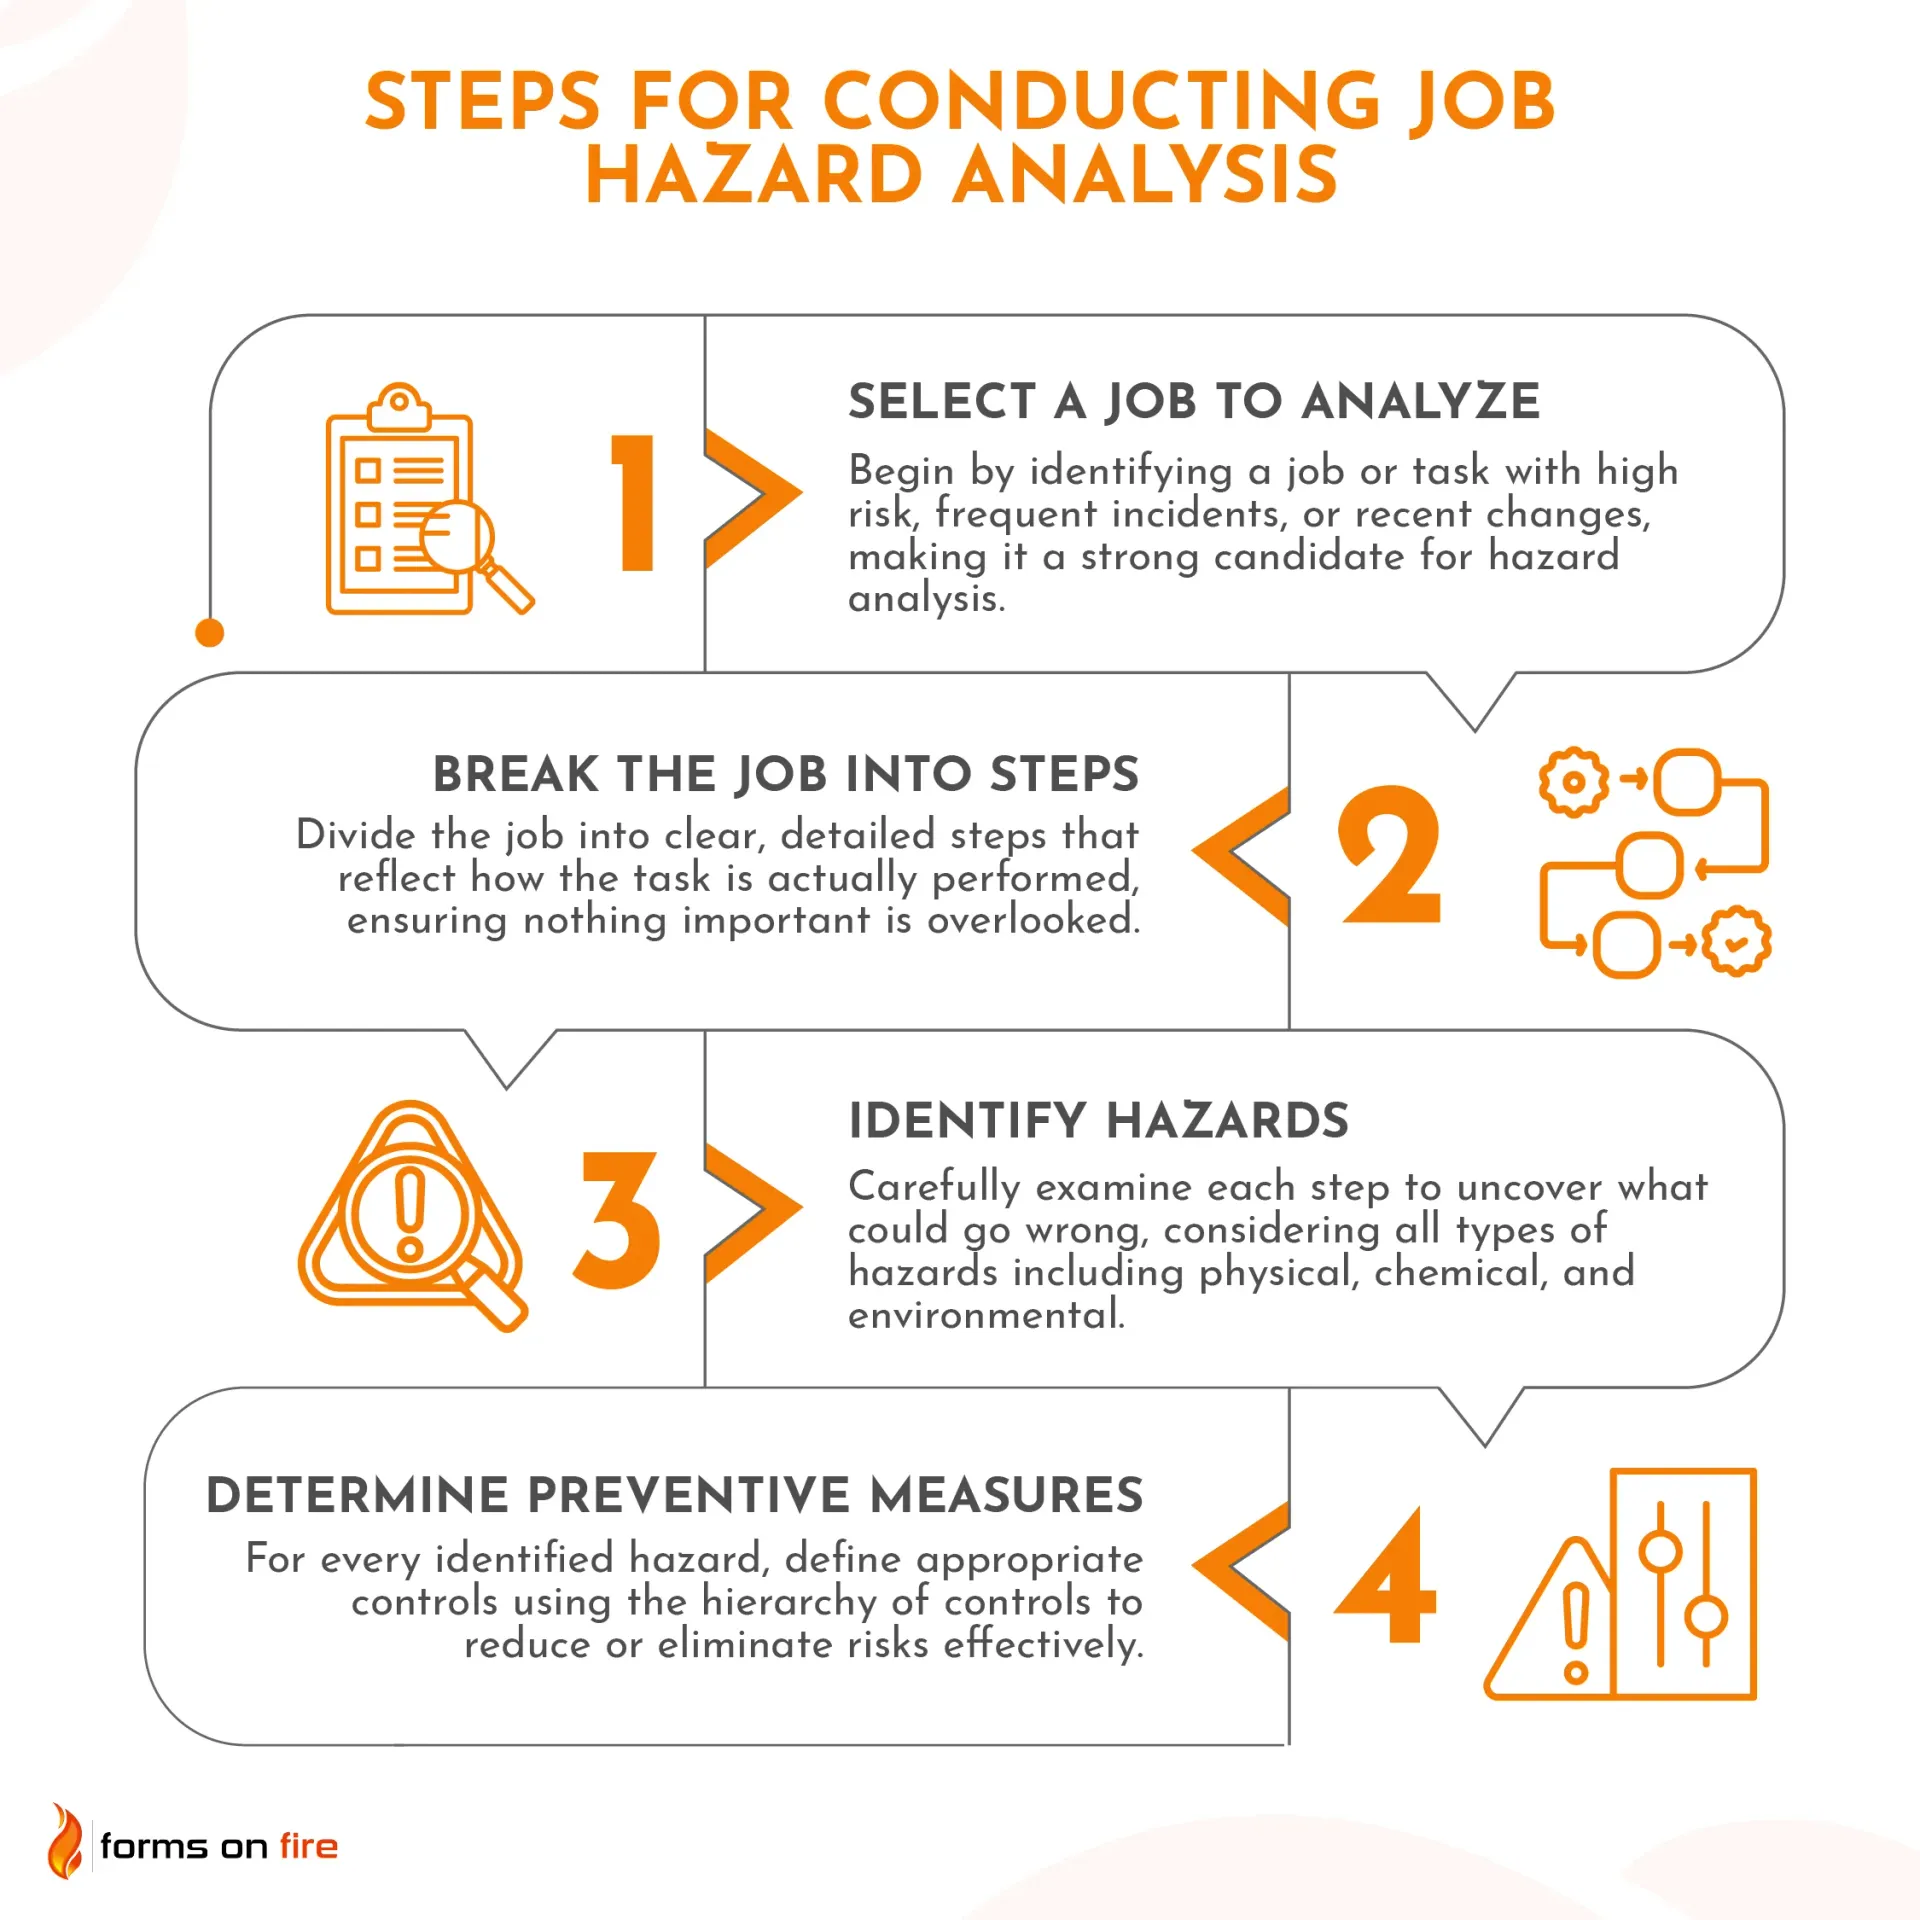
Go step by step and identify what could go wrong. Consider all types of hazards — physical, chemical, biological, ergonomic, or environmental.
Go step by step and identify what could go wrong. Consider all types of hazards — physical, chemical, biological, ergonomic, or environmental.
Example for 4th step (“Open access panels and inspect internal components”):
- Sharp edges inside the unit → risk of cuts
- Contact with energized parts → electrical shock
- Hot surfaces → burn hazard
🔍 Tip: If you end up with a big list of hazards, use a risk matrix to help prioritize which ones to tackle first based on likelihood and severity.
4) Determine preventive measures (hazard controls)
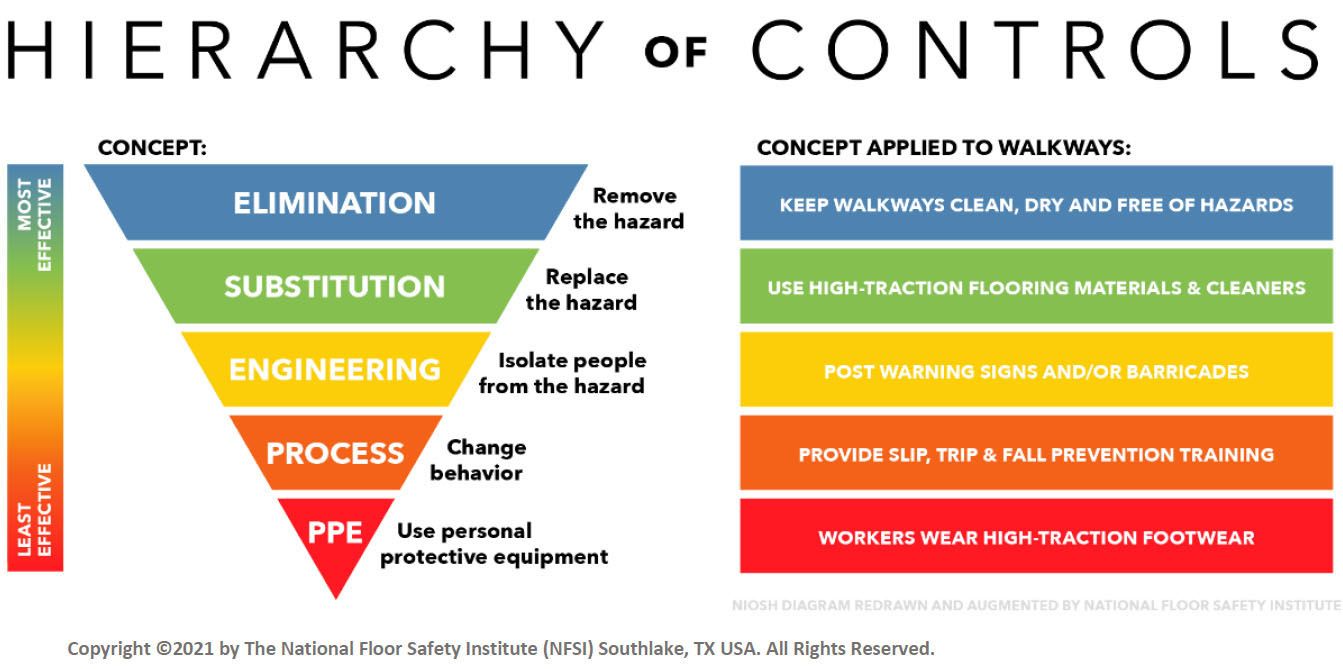
For each hazard, decide how it can be eliminated or controlled. Use the hierarchy of controls. Eliminating the hazard entirely is the safest option, but it is often not practical to do so. In those cases, look for alternative mitigation methods.
Example for 4th step (controls for sharp edges, burns, and electrical shock):
- Wear cut-resistant gloves and insulated tools (PPE).
- Post clear signage and require lockout/tagout before inspection (administrative control).
- Install protective guards inside the unit where possible (engineering control).
Now that you have an idea of how the process looks, let’s make sure you are following best practices.
Best practices for effective job safety analysis
The following best practices will help ensure your JHAs are not just check-the-box exercises, but useful tools that actually reduce risk and improve safety:
- Involve front-line workers and supervisors: The people doing the job every day are the ones who know where the real hazards are. Involve them in the process — their input improves hazard identification.
- Keep language clear and practical: Avoid jargon or overly technical terms. Use plain language so the JHA is easy for anyone on the team to read and follow (especially new hires).
- Use real-world examples of hazards: Generic warnings don’t help much. Be specific about what could go wrong — like “slip hazard from oil leak near compressor” — so people can actually take action on it.
- Integrate JHAs into broader safety programs: JHAs should tie into things like training, toolbox talks, and safety audits. They’re not a separate process — they’re part of the big picture.
- Use technology or apps to streamline the process: Digital tools help standardize forms, speed up documentation, and make it easy to track follow-ups. Mobile apps let you complete JHAs right on the job site.
- Follow up on identified controls: If your JHA recommends a new procedure or piece of PPE, make sure it’s actually implemented — and check back to see if it’s working.
- Update JHAs after incidents or process changes: If there’s been an injury, near miss, or change to the way the job is done, review and revise the JHA. A good safety process is always evolving.
Better safe than sorry
A job hazard analysis doesn’t take much time — but it can make a huge difference. It helps prevent injuries, improves training, and keeps your team focused on doing work the safe way.
If you haven’t looked at your JHAs in a while, now’s a good time. And if you don’t have any in place yet, just start with one high-risk task and build from there.
✅ Start Forms On Fire free trial
✅ Use our drag-and-drop form builder to create a simple JHA template
✅ Pick one job and analyze it
✅ Implement hazard controls
✅ Rinse and repeat for other jobs
It’s a small but smart investment in workplace safety.